
Cara Install LAMP di Debian 9 – Pada artikel sebelumnya saya sudah memberikan tutorial tentang Panduan Cara Install LAMP di CentOS 7. Dan sesuai janji saya pada artikel sebelumnya, kali ini saya akan memberikan tutorial untuk anda tentang Cara Install LAMP di Debian 9.

Cara Install LAMP di Debian 9
Lakukan update dan upgrade terlebih dahulu
sudo apt update
sudo apt upgrade
Install Apache Web Server
1. Install Web Server Apache
apt install apache2 apache2-utils
2. Memberikan permission agar apache(www:data) mempunyai hak untuk mengakses direktori
chown www-data:www-data /var/www/html/ -R
3. Setelah terpasang, Apache secara otomatis akan dijalankan. Untuk memeriksa apakah Apache sudah berjalan, cek dengan perintah systemctl:
systemctl status apache2
Outputnya:
? apache2.service - The Apache HTTP Server
   Loaded: loaded (/lib/systemd/system/apache2.service; enabled; vendor preset:
   Active:
active (running) since Sun 2017-08-13 02:36:48 UTC; 5min ago
 Main PID: 14463 (apache2)
   CGroup: /system.slice/apache2.service
           ??14463 /usr/sbin/apache2 -k start
           ??14465 /usr/sbin/apache2 -k start
           ??14466 /usr/sbin/apache2 -k start
4. Jika Apache belum berjalan seperti diatas, maka jalankan perintah berikut:
systemctl start apache2
5. Untuk menjalankan Apache secara otomatis ketika Debian dijalankan ulang, jalankan perintah berikut:
systemctl enable apache2
Install Database MariaDB
MariaDB adalah pengganti MySQL. Pasang MariaDB di Debian 9.
1. Install mariaDB
apt install mariadb-server mariadb-client
2. selanjutnya anda diharuskan untuk mengkonfigurasi MariaDB, dengan mengeset kata sandi, membatasi akses, dan menghapus pengguna dan database yang tidak digunakan, gunakan perintah berikut
mysql_secure_installation
NOTE: RUNNING ALL PARTS OF THIS SCRIPT IS RECOMMENDED FOR ALL MySQL
SERVERS IN PRODUCTION USE!  PLEASE READ EACH STEP CAREFULLY!
In order to log into MySQL to secure it, we'll need the current
password for the root user.  If you've just installed MySQL, and
you haven't set the root password yet, the password will be blank,
so you should just press enter here.
Enter current password for root (enter for none):     ## Press Enter ##
OK, successfully used password, moving on...
Setting the root password ensures that nobody can log into the MySQL
root user without the proper authorisation.
Set root password? [Y/n]   Y  ## Press Enter ##
New password:                ## Enter new password ##
Re-enter new password:       ## Re-enter new password ##
Password updated successfully!
Reloading privilege tables..
... Success!
By default, a MySQL installation has an anonymous user, allowing anyone
to log into MySQL without having to have a user account created for
them.  This is intended only for testing, and to make the installation
go a bit smoother.  You should remove them before moving into a
production environment.
Remove anonymous users? [Y/n]  Y   ## Press Enter ##
 ... Success!
Normally, root should only be allowed to connect from 'localhost'.  This
ensures that someone cannot guess at the root password from the network.
Disallow root login remotely? [Y/n]     ## Press Enter ##
... Success!
By default, MySQL comes with a database named 'test' that anyone can
access.  This is also intended only for testing, and should be removed
before moving into a production environment.
Remove test database and access to it? [Y/n]     ## Press Enter ##
 - Dropping test database...
... Success!
- Removing privileges on test database...
... Success!
Reloading the privilege tables will ensure that all changes made so far
will take effect immediately.
Reload privilege tables now? [Y/n]     ## Press Enter ##
 ... Success!
Cleaning up...
All done!  If you've completed all of the above steps, your MySQL
installation should now be secure.
Thanks for using MySQL!
3. Setelah terpasang, layanan MariaDB secara otomatis akan dijalankan. Periksa dengan perintah berikut:
systemctl status mariadb
Outputnya:
? mariadb.service - MariaDB database server
   Loaded: loaded (/lib/systemd/system/mariadb.service; enabled; vendor preset: enabled)
   Active: active (running) since Sun 2017-10-01 03:05:17 UTC; 1min 37s ago
 Main PID: 16127 (mysqld)
   Status: "Taking your SQL requests now..."
   CGroup: /system.slice/mariadb.service
           ??16127 /usr/sbin/mysqld
4. Jika MariaDB belum berjalan seperti diatas, maka jalankan perintah berikut:
systemctl start mariadb
5. Untuk mengaktifkan MariaDB secara otomatis saat Debian dijalankan ulang, jalankan
systemctl enable mariadb
Install PHP 7.1
1. Install PHP
apt install php7.0 libapache2-mod-php7.0 php7.0-mysql php-common php7.0-cli php7.0-common php7.0-json php7.0-opcache php7.0-readline
2. Aktifkan modul php7.0 kemudian jalankan ulang Apache.
sudo a2enmod php7.0
sudo systemctl restart apache2
3. Cek versi php
php --version
Outputnya:
PHP 7.0.19-1 (cli) (built: May 11 2017 14:04:47) ( NTS )
Copyright (c) 1997-2017 The PHP Group
Zend Engine v3.0.0, Copyright (c) 1998-2017 Zend Technologies
    with Zend OPcache v7.0.19-1, Copyright (c) 1999-2017, by Zend Technologies
Memeriksa Integrasi PHP dengan Apache
Untuk menguji skrip PHP dengan Apache, kita akan membuat berkas info.php didalam direktori root Apache.
nano /var/www/html/info.php
Masukin kode berikut didalam file info.php
<?php phpinfo(); ?>
Lalu buka http://ipaddress/info.php maka akan tampil semua informasi seperti pada gambar berikut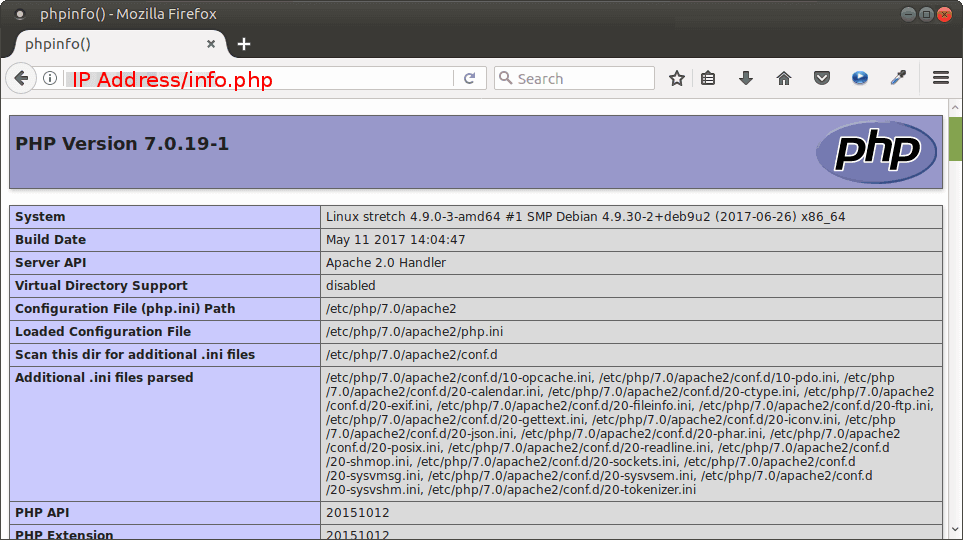
Jika apache sudah terintegrasi dengan php dan juga mysql, itu artinya vps anda sudah bisa untuk diinstall website seperti wordpress dsb. Baca juga: Cara Setting VPS Linux Untuk Web Hosting
Demikian tutorial Cara Install LAMP di Debian 9. Jika ada yang ingin ditanyakan, silahkan tinggalkan komentar dibawah ini.